OMG! ZIRIA! ZIRIA!! ZIRIA!!! IT ACTUALLY HAPPENED!! 34 YEARS LATER!! The epic/legendary Tengai Makyou/Far East of Eden: Ziria JRPG has finally been localized! Supper the Subtitler struck again! Simply unstoppable, NOTHING can prevent him from TOTAL PCECD localization domination!!!! WHACHA GONNA DO BROTHER?!?! |
This section allows you to view all posts made by this member. Note that you can only see posts made in areas you currently have access to.
#201
#203
 PCE/TG-16|CD/SGX Discussion / Re: I give up. The Genesis is true 16Bit and the PCE is a 16Bit imposter.
02/02/2011, 12:38 PM
Quote from: GobanToba on 02/02/2011, 02:14 AMGenesis can be used as a vacuum, kicking ass and cleaning-up the PCE leftovers.HEAR YE, HEAR YE, BEAR WITNESS TO TEH TOWER OF FAIL.
#204
Off-Topic / Re: Random Pictures Thread
02/02/2011, 01:24 AM
Fapierry:


Quote from: Tatsujin on 02/01/2011, 07:43 PMlol, fap is even in my common german <> english dictionary contained.
#205
Fighting Street / Re: PCENGINEFX chat box quips
01/28/2011, 05:22 PMQuote from: JoshTurboTrollX-16 on 01/28/2011, 05:10 PMDOG DAMNIT BALLOONRANEV BUTTTT THE FCUK OUT OF ARE CONVERSTTAIOTION!!! I AM GTEEING EXTREMELEE SIC AN TIREDD OF EECH TIME I POST HEAR I C SOME SMARDASS REMRACK MADE BY YUO!! DO YOU HAEV A LIVE? DO YUO HEAVE ANYHTING BETTER TO DOO BESDIES RUIN MY FUKIGN LIFE!!??
ONE MOARE SNAPPY COMENT LIEK THIS AND I WILL QUIIT PCENLGINWETRYEFX.COM FOR GOOD!!
HardCAW Cru.
#206
Off-Topic / Re: Random Pictures Thread
01/28/2011, 03:51 AMQuote from: TR0N on 01/26/2011, 03:24 AMYOU WOULD DOOO ANNNNYTHING FOR LOOOVE.
Wait. What the fuck is photo-shopped on to TurdfLoaf's head ?
BUT I WOOOONT DOOO THAAAAT. EVAR.
#208
PCE/TG-16|CD/SGX Discussion / Re: Turbo Gouging on Ebay ( r.i.p. - gouging much )
01/26/2011, 02:05 AM
Quote from: guest on 01/21/2011, 11:56 AMIn case anyone didn't see this...Quote from: Lum on 01/21/2011, 11:53 AMWhat better resources to determine Turbo game pricing are there?www.pcengine-fx.com/forums
QUOTED FOR TRUTH, NEVERMOAR.
I mean Jesus fucking Christ people, we ARE the goddamn authority on this stuff.
Anyone who pays more than $40 for Magical Chase is a fucking Idiot. Capital I.
Arkhan gets it. Do you?
#209
Fighting Street / Re: Hahahaha Yes!
01/18/2011, 03:16 AMedit: Alex, you made me think of this photo, lolz.
#210
PCE/TG-16|CD/SGX Discussion / Re: a BONK sighting?
01/11/2011, 10:18 PM

#212
PCE/TG-16|CD/SGX Discussion / Re: Whats ur Obey resolution for 2011?!?
01/11/2011, 03:55 AM
Quote from: turbogrfxfan on 01/10/2011, 06:30 PMha ha ha very clever!!.............. from a guy from Idaho or whateverLMAOj/k
Quote from: guest on 01/10/2011, 03:25 PMHmmm.... seems the most common OBEY resolution is 256x239.
#213
PCE/TG-16|CD/SGX Discussion / Re: Race is on B1tches! - How many have you cleared?
01/04/2011, 03:25 AM
Clear #17:
The Manhole / マンホール
I wandered around for three or so hours. Covered everything. A lot longer than it took to clear Flash Hiders.
The Manhole / マンホール
I wandered around for three or so hours. Covered everything. A lot longer than it took to clear Flash Hiders.
#214
PCE/TG-16|CD/SGX Discussion / Re: Race is on B1tches! - How many have you cleared?
01/03/2011, 08:07 PM
Clear #16:
Street Fighter II - Champion Edition / ストリートファイターII'
Street Fighter II - Champion Edition / ストリートファイターII'
#215
Buy/Sell/Trade / Boxing Day Giveaway!! - F1 Circus Special Pole To Win SCD!
12/22/2010, 01:46 AM
In a show of solidarity to our Canadian friends (but not limited to Canada), a Boxing Day Giveaway!
Plus I think the holiday is pretty cool, in concept.
F1 Circus Pole to win CD - LOOSE Minor scratching, but it plays fine. FREE and shipped to your door.
Reply to this thread with your favorite Boxer (Yes, I know it's political and related to the workforce, the whole reversal of roles with the workers and bosses, etc. btw, ) and I'll enter you into the contest!!
EDIT: You do NOT have to be Canadian to enter this contest!

CONGRATULATIONS TO GOGAN!!
Entrants:
RR1980
Duo_R
The Chief
turbogrfxfan
BlueBMW
Gogan
Opethian
ceti alpha
Plus I think the holiday is pretty cool, in concept.
F1 Circus Pole to win CD - LOOSE Minor scratching, but it plays fine. FREE and shipped to your door.
Reply to this thread with your favorite Boxer (Yes, I know it's political and related to the workforce, the whole reversal of roles with the workers and bosses, etc. btw,
EDIT: You do NOT have to be Canadian to enter this contest!
CONGRATULATIONS TO GOGAN!!
Entrants:
RR1980
Duo_R
The Chief
turbogrfxfan
BlueBMW
Gogan
Opethian
ceti alpha
#217
Off-Topic / Re: Random Pictures Thread
12/19/2010, 11:59 PMQuote from: JoshTurboTrollX-16 on 12/14/2010, 01:49 PMI shake me head too.Again for teh lulz.
#218
Off-Topic / Re: Random Pictures Thread
12/18/2010, 06:08 AM #220
Off-Topic / Re: teh PCEngineFX Fix-It-Kitty (aka lolAnimals) thread
12/14/2010, 01:09 PM
So everyone knows what mathius is talking about, lol
#221
Off-Topic / Re: teh PCEngineFX Fix-It-Kitty (aka lolAnimals) thread
12/14/2010, 03:17 AM
For some reason, all I could think of was Tatsujin
#230
Off-Topic / Re: Random Pictures Thread
12/06/2010, 12:25 PMQuote from: Tatsujin on 12/06/2010, 10:13 AMWow. Talk about an optical illusion!
#231
Off-Topic / Re: teh PCEngineFX Fix-It-Kitty (aka lolAnimals) thread
12/05/2010, 04:36 AM
I think that was Arkhan's hand in teh previous photo, same charm bracelet
#234
Off-Topic / Re: teh PCEngineFX Fix-It-Kitty (aka lolAnimals) thread
11/25/2010, 04:19 AM
#235
Off-Topic / Re: teh PCEngineFX Fix-It-Kitty (aka lolAnimals) thread
11/23/2010, 08:05 PM
HAHHAH, Nec thats great! 
#236
Off-Topic / teh PCEngineFX Fix-It-Kitty (aka lolAnimals) thread
11/23/2010, 05:01 PM
I'll start.
#237
Off-Topic / The “What-Did-You-Buy-Today?” Thread
11/23/2010, 02:33 AMQuote from: hoobs88 on 11/22/2010, 10:48 PMI like having a variety of different controllers to choose from when playing games and I had never seen this one before so I picked it up.Which is the "Run" Button?
#238
Off-Topic / Re: Random Pictures Thread
11/22/2010, 02:46 PMQuote from: JoshTurboTrollX-16 on 11/19/2010, 11:28 AMlove this one-
/1290135352631.gif
Quote from: guest on 11/22/2010, 11:27 AMApparently, his dream didn't involve being funny.XKCD is hit or miss. Sometimes it's hilarious, sometimes meh.
#239
 Console Repair/Mod Center / Re: REPAIR GUIDE - TurboDuo/PC Engine Duo/R/RX: Laser Swap & Adjustment Guide
11/20/2010, 08:12 PM
Adjusting the Pots:
Advanced Users/Modders only! (unless you really want to risk it...)
BEFORE YOU TOUCH ANY POTS, USE A THIN PERMANENT MARKER TO MARK EACH POT'S ORIENTATION.
Tips: The main issue is breaking a pot, or putting it so out of whack the CD player won't read discs at all. Be very gentle, and go SLOWLY when rotating the screwdriver, trying for just a few degrees (out of 360) at a time. This is 20 year-old technology and electrolytic fluid may have weakened the traces. VR102 is the place to start. Please reference BMW's photo below before proceeding.
What You will need:
1 Multimeter with Resistance (Ohms)
1 #0 Philips-head Screwdriver
1 Ocilloscope (optional)
Regarding the Trim Pots For the Turbo Duo/PCE Duo and taken from this post:
pcengine-fx.com/forums/index.php?topic=3586.0
http://www.repairfaq.org/sam/cdfaq.htm
Also BlueBMW's guide to adjusting the pots by ear, which is brilliant!
Advanced Users/Modders only! (unless you really want to risk it...)
BEFORE YOU TOUCH ANY POTS, USE A THIN PERMANENT MARKER TO MARK EACH POT'S ORIENTATION.
Tips: The main issue is breaking a pot, or putting it so out of whack the CD player won't read discs at all. Be very gentle, and go SLOWLY when rotating the screwdriver, trying for just a few degrees (out of 360) at a time. This is 20 year-old technology and electrolytic fluid may have weakened the traces. VR102 is the place to start. Please reference BMW's photo below before proceeding.
What You will need:
1 Multimeter with Resistance (Ohms)
1 #0 Philips-head Screwdriver
1 Ocilloscope (optional)
Regarding the Trim Pots For the Turbo Duo/PCE Duo and taken from this post:
pcengine-fx.com/forums/index.php?topic=3586.0
Quote from: Charlie on 06/29/2009, 06:00 PMThese measurement points may help.Also, the Duo-R and DuoRX DO NOT have a vr104 pot.
VR101 = E/F balance, pin 13 of U101
VR102 = Focus Offset, pin 18 of U101
VR103 = Track Gain (Track error level), pin 45 of U102
VR104 = Focus Gain, pin 48 of U102
VR105 = VCO, pin 30 of U102
Charlie
Quote from: dudule on 11/21/2009, 06:21 AMmy DuoRX:Thanks to BlueBMW for this troubleshooting/repair link and adjustment photo that is very helpful!!!:
vr101:AB=12.33 AC=10.65 BC=19.55
vr102:AB=7.89 AC=8.11 BC=11.28
vr103:AB=7.25 AC=7.14 BC=18.46
vr105:AB=0.38 AC=0.00 BC=0.38
http://www.repairfaq.org/sam/cdfaq.htm

Also BlueBMW's guide to adjusting the pots by ear, which is brilliant!
Quote from: BlueBMW on 11/20/2010, 10:27 PMAddendum: Adjusting the pots by ear!
Adjusting your duo's pot can be a daunting task for anyone. With the high cost of replacement hardware, none of use want to permanently damage our precious Duos! Here I will try and explain in idiots terms, the adjustment of the Duo pots.
Preliminary setup:
I do my adjustments live. Meaning I have the system on and hopefully spinning / reading the disc while I do adjustments. To facilitate this, I remove the magnet from the CD lid (turn the retainer ring until it releases the magnet) And then I place a piece of tape or whatever over the lid closed switch. At this point I place an audio CD on the spindle and place the magnet on top of it to hold it in place.
Adjustment:
I use a small philips screwdriver to turn the pots. If you look closely at them, they have 4 little notches that a screwdriver fits into perfectly.
Once you have a CD in place and everything is ready to go, turn on the system. If you don't want to connect your Duo to a tv, you can use headphones instead. Press the run button on the controller. If the CD starts spinning.... Great! If not, we'll start with two of the pots:
VR102 and VR104
VR102 has a small range of adjustment in which the CD will start to spin. If you turn it and the cd starts to spin, then you know you have found one end of the adjustment. Keep turning it until the CD stops again. Once you know approximately where those two points are, you can find a sweet spot in the middle.
VR104 seems to be similar to VR102 in that there is a certain range in which the CD will spin. Again try and find the sweet spot in the middle of the two points of spin/no spin.
By this point, hopefully you have the CD spinning, and maybe even attempting to read! So lets move on to the next pot/s.....
VR101 and VR103
VR101 is kind of a by ear pot. There seems to be a small range that works for proper cd playback. Typically it seems to be in the 0 to 45 degree range with 0 degrees being horizontal. You should hear some scratchy funny noises when VR101 isn't adjusted properly. Try and find a quiet spot for it. If you go too far it will get very noisy. Hopefully you can find a spot where the CD audio will start to play.
VR103 is, from what I can tell, an error correction adjustment. Hopefully you have got a CD spinning reliably at this point. You might hear a whiney faint scratchy noise at this point.... adjust VR103 clockwise until the noise goes away. If you go too far, the noise will come back only it will be a lower tone and not sound good.
VR105
Lastly, VR105.... This is an adjustment for the spindle speed correction. I'm not 100% on the best way to describe adjusting this one. Basically if the spindle speed starts to run away (go REALLY fast) then you've gone too far. Hopefully by this point, your CD will play music. Try and play later tracks on the CD and if they struggle to play, try adjusting VR105 until you can play all the tracks reliably.
Hopefully this helps, any suggestions are appreciated!
#240
Console Repair/Mod Center / REPAIR GUIDE - PCE|TurboDuo/R/RX: CD Laser Swap & Adjustment Guide
11/20/2010, 04:29 PM
Hello Everyone,
I will have the differences between the PCE/Turbo/Duo-R listed in the next few weeks; one of each is in for repair right now. If people would like to chime in with tips, corrections, or additions, please do so and I will update the guide. A section on adjusting the posts will be towards the end as soon as I have gathered all the information. For each successful repair you will need:
1 HOP-M3 Laser
1 Duo (Turbo Duo, PCE Duo, Duo-R, Duo-RX)
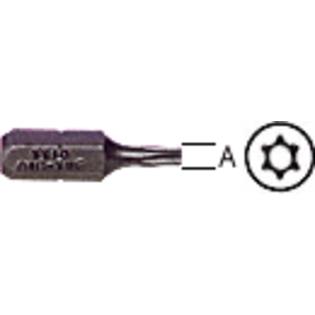
1 Torx T-10 bit/screwdriver with a security center (Japanese Systems)
OR
1 5/16" Gamebit (USA Turbo Duo)
1 Small bottle of White Lithium or Clear Silicone Grease
5 #40 x 1/2" Phillips head pan screws to replace the T-10's (optional)
PC Engine Duo (Black):
pce-duoswap001.jpg
There are two generations of the PCE Duo, this being the first gen with the "Large Capacitor" as chop5 has pointed out. First, flip the duo over and pull out each of the five Torx T-10 screws. A T-10 Security Torx Bit with recessed center point can be purchased at Sears or a Hardware store. A regular flat t-10 can be used but it's harder to navigate around the center security bit and you risk rounding out the screw.

power-tool-accessories/drill-bits/2629392
product_image/27SBT10.jpg
pce-duoswap002.jpg
Once you remove them, put them in a small cup or shot-glass to make sure you have easy access to them I recommend replacing them with a comparable Phillips head (take one of the screws to your local Ace or True Value Hardware Store and get five #40 x 1/2" pan screws) so you don't have to deal with the headache again.
Now that the system is open, carefully lift the cover directly off of the board and bottom casing. Take your time so you don't harm any of the internals.
pce-duoswap003.jpg
NOTE: The unit pictured has had a complete cap replacement with green hi-temp NTK capacitors, so if yours are small and silver, don't panic, this is the normal OEM setup. Now, Zooming In on the Laser area...
The motor for the laser (silver cylinder, top of photo 4) is a typical 9V motor that can be found at a hobby store and can be tested for continuity with a 9v battery due to the PCE Duo's 9V voltage. It's hard to get the dang thing back in, de-soldering the wire is the easy part, just watch those gears. The very tiny screws are aluminum, and non-magnetic so make sure you have a steady hand if you have to replace the motor. I've only seen one go bad, ever so I would bet this is not the issue. Make sure to add some extra White Lithium Grease at this point to ensure your gears stay properly lubricated.
pce-duoswap004.jpg
Carefully, and not forcing it, lift the laser cover off from the bottom right-hand corner of the cover, it should click right off, and pull away to the left; always make sure not to disturb the laser or the wires.
pce-duoswap005.jpg
Now that we have the laser cover off, we can see what the laser really looks like and what it is connected to. The laser slides across two metal posts that hold it on its track, and it connects to the motor and two gears via the top track which is part of the laser assembly. The HOP-M3 is connected to the motherboard by two ribbon cables; the white connector on the top, and the red connector on the bottom.
pce-duoswap006.jpg
Presumably your laser has been returned to the origin position, next to the spindle, like in the next photo. DO NOT UNDER ANY CIRCUMSTANCES, FORCE THE LASER at this point, for risk of harming the fragile plastic gears. Next, very gently; unplug the two connectors (the white first, then the red) applying equal pressure on both sides of the connectors, so you don't harm them or pull a wire off or out of the plug(s).
At this point we must Zoom in again to the right-hand side of the laser assembly, specifically the two black plastic 90 degree screws that hold the tracks in place (note: the tracks are not held in on the left side, so be careful when removing them so you don't pull wire or move too quickly).
pce-duoswap007.jpg
At this point the black screws need to "opened" so the laser can be lifted up and slid off the tracks. Using a Phillips head screwdriver, turn each of the screws 90 degrees CCW.
Now, carefully; lift the tracks from the right side at a very gradual angle (almost vertical at first) to first unseat the track from the gears, and then lift the tracks up and to the left to slide off the old laser. Remember that on the left side the tracks are in a seat, and not connected to anything.
pce-duoswap008.jpg
The New HOP-M3 arrived from Electronix.com, in a sealed blue plastic bag. The price was around $22 plus shipping. The customer service reps were very friendly, and they give volume discounts with the more you buy. Here is a direct link to the laser, don't let the stock photo fool you. If you don't get the correct one they will make your order right.
archive.org/cd-dvd-cd-pickups-c-435_440_450_456
electronix.com/cd-pickup-hopm3-p-14472.html - No longer in business/stock, try eBay!
Model: HOP-M3, Cost: $18.95
pce-duoswap009.jpg
Make sure to use plenty of white lithium grease on the tracks after the re-installation of the new laser, and make sure to lay it down vertically initially as to not harm the gears again. Lube the gears with plenty of grease, and also the arm for the motor, which may be close to dry as well.
Once the new laser is back in place secure the tracks by putting them flat, and turning the black plastic lock-screws 90 degrees clockwise. Now that the HOP-M3 is physically installed, clip back in the two wire connectors; red first, white second, applying even pressure on both side while taking care to not to force it, or harm the laser. You should feel a "click" upon successful re-installation of the clips. Make sure they're on there tight.
At this point, your Duo should look like Image #6. Re-install the dust cover for the CD; without it it is very common to get a "Set Disc Error". Angle it downward towards the left top corner, and install that corner first, then apply even pressure while clicking down on the bottom right side. The dust cover should set nicely back into place.
Your Laser is now physically installed.
pce-duoswap0010.jpg
Provided your Duo does not need a Pot adjustment, You can close it back up. Remember to replace the security bits with the Phillips head screws.
I will have the differences between the PCE/Turbo/Duo-R listed in the next few weeks; one of each is in for repair right now. If people would like to chime in with tips, corrections, or additions, please do so and I will update the guide. A section on adjusting the posts will be towards the end as soon as I have gathered all the information. For each successful repair you will need:
1 HOP-M3 Laser
1 Duo (Turbo Duo, PCE Duo, Duo-R, Duo-RX)
1 Torx T-10 bit/screwdriver with a security center (Japanese Systems)
OR
1 5/16" Gamebit (USA Turbo Duo)
1 Small bottle of White Lithium or Clear Silicone Grease
5 #40 x 1/2" Phillips head pan screws to replace the T-10's (optional)
PC Engine Duo (Black):
pce-duoswap001.jpg
There are two generations of the PCE Duo, this being the first gen with the "Large Capacitor" as chop5 has pointed out. First, flip the duo over and pull out each of the five Torx T-10 screws. A T-10 Security Torx Bit with recessed center point can be purchased at Sears or a Hardware store. A regular flat t-10 can be used but it's harder to navigate around the center security bit and you risk rounding out the screw.
power-tool-accessories/drill-bits/2629392
product_image/27SBT10.jpg
pce-duoswap002.jpg
Once you remove them, put them in a small cup or shot-glass to make sure you have easy access to them I recommend replacing them with a comparable Phillips head (take one of the screws to your local Ace or True Value Hardware Store and get five #40 x 1/2" pan screws) so you don't have to deal with the headache again.
Now that the system is open, carefully lift the cover directly off of the board and bottom casing. Take your time so you don't harm any of the internals.
pce-duoswap003.jpg
NOTE: The unit pictured has had a complete cap replacement with green hi-temp NTK capacitors, so if yours are small and silver, don't panic, this is the normal OEM setup. Now, Zooming In on the Laser area...
The motor for the laser (silver cylinder, top of photo 4) is a typical 9V motor that can be found at a hobby store and can be tested for continuity with a 9v battery due to the PCE Duo's 9V voltage. It's hard to get the dang thing back in, de-soldering the wire is the easy part, just watch those gears. The very tiny screws are aluminum, and non-magnetic so make sure you have a steady hand if you have to replace the motor. I've only seen one go bad, ever so I would bet this is not the issue. Make sure to add some extra White Lithium Grease at this point to ensure your gears stay properly lubricated.
pce-duoswap004.jpg
Carefully, and not forcing it, lift the laser cover off from the bottom right-hand corner of the cover, it should click right off, and pull away to the left; always make sure not to disturb the laser or the wires.
pce-duoswap005.jpg
Now that we have the laser cover off, we can see what the laser really looks like and what it is connected to. The laser slides across two metal posts that hold it on its track, and it connects to the motor and two gears via the top track which is part of the laser assembly. The HOP-M3 is connected to the motherboard by two ribbon cables; the white connector on the top, and the red connector on the bottom.
pce-duoswap006.jpg
Presumably your laser has been returned to the origin position, next to the spindle, like in the next photo. DO NOT UNDER ANY CIRCUMSTANCES, FORCE THE LASER at this point, for risk of harming the fragile plastic gears. Next, very gently; unplug the two connectors (the white first, then the red) applying equal pressure on both sides of the connectors, so you don't harm them or pull a wire off or out of the plug(s).
At this point we must Zoom in again to the right-hand side of the laser assembly, specifically the two black plastic 90 degree screws that hold the tracks in place (note: the tracks are not held in on the left side, so be careful when removing them so you don't pull wire or move too quickly).
pce-duoswap007.jpg
At this point the black screws need to "opened" so the laser can be lifted up and slid off the tracks. Using a Phillips head screwdriver, turn each of the screws 90 degrees CCW.
Now, carefully; lift the tracks from the right side at a very gradual angle (almost vertical at first) to first unseat the track from the gears, and then lift the tracks up and to the left to slide off the old laser. Remember that on the left side the tracks are in a seat, and not connected to anything.
pce-duoswap008.jpg
The New HOP-M3 arrived from Electronix.com, in a sealed blue plastic bag. The price was around $22 plus shipping. The customer service reps were very friendly, and they give volume discounts with the more you buy. Here is a direct link to the laser, don't let the stock photo fool you. If you don't get the correct one they will make your order right.
archive.org/cd-dvd-cd-pickups-c-435_440_450_456
Model: HOP-M3, Cost: $18.95
pce-duoswap009.jpg
Make sure to use plenty of white lithium grease on the tracks after the re-installation of the new laser, and make sure to lay it down vertically initially as to not harm the gears again. Lube the gears with plenty of grease, and also the arm for the motor, which may be close to dry as well.
Once the new laser is back in place secure the tracks by putting them flat, and turning the black plastic lock-screws 90 degrees clockwise. Now that the HOP-M3 is physically installed, clip back in the two wire connectors; red first, white second, applying even pressure on both side while taking care to not to force it, or harm the laser. You should feel a "click" upon successful re-installation of the clips. Make sure they're on there tight.
At this point, your Duo should look like Image #6. Re-install the dust cover for the CD; without it it is very common to get a "Set Disc Error". Angle it downward towards the left top corner, and install that corner first, then apply even pressure while clicking down on the bottom right side. The dust cover should set nicely back into place.
Your Laser is now physically installed.
pce-duoswap0010.jpg
Provided your Duo does not need a Pot adjustment, You can close it back up. Remember to replace the security bits with the Phillips head screws.
#241
Buy/Sell/Trade / blueraven's NeverMoar Freebies... Now with added Raffles!
11/18/2010, 09:02 PM
A bag of nothing free to the first person who responds. ALSO...
If you want any of these games, please send me $2.50 shipping plus $1 shipping per additional game. Free to the first person who wants them, and I willstrikethru the ones that are spoken for as soon as I receive a pm.
---- Master System
Missile Defense 3-D
---- Genesis
Jack Nicklaus' Power challenge golf
---- XBOX
Xbox Magazine Disc #20 - NBA Street Vol.2, Gladius, Inside Pitch 2003, Jurassic Park: Operation Genesis. FREE SHIPPING when you buy another game
---- XBOX 360:
Harry Potter & The Goblet of Fire
Star Wars Episode III: Return of the Sith
Splinter Cell
---- Gamecube
The Sum of All Fears
---- PS1
Madden 2000
NBA Live 2000
---- PS2
007 Nightfire
Lord Of The Rings: Fellowship of the Ring
Jax & Dexter - Greatest Hits
The Incredibles - Greatest Hits
Namco Museum Vol.2 - LOOSE (free shipping when you buy another game)
Prince Of Persia: The Sands of Time
Splashdown
WWE Smackdown Vs. Raw
---- Win 95/98 CD:
Lemmings & Oh No! More Lemmings! on PC CD-Rom Out to Soviet Conscript
----
edit: Thread Updated Please wait for Moar!
If you want any of these games, please send me $2.50 shipping plus $1 shipping per additional game. Free to the first person who wants them, and I will
---- Master System
Missile Defense 3-D
---- Genesis
Jack Nicklaus' Power challenge golf
---- XBOX
Xbox Magazine Disc #20 - NBA Street Vol.2, Gladius, Inside Pitch 2003, Jurassic Park: Operation Genesis. FREE SHIPPING when you buy another game
---- XBOX 360:
Harry Potter & The Goblet of Fire
Star Wars Episode III: Return of the Sith
Splinter Cell
---- Gamecube
The Sum of All Fears
---- PS1
Madden 2000
NBA Live 2000
---- PS2
007 Nightfire
Lord Of The Rings: Fellowship of the Ring
Jax & Dexter - Greatest Hits
The Incredibles - Greatest Hits
Namco Museum Vol.2 - LOOSE (free shipping when you buy another game)
Prince Of Persia: The Sands of Time
Splashdown
WWE Smackdown Vs. Raw
---- Win 95/98 CD:
----
edit: Thread Updated Please wait for Moar!
#242
PCE/TG-16|CD/SGX Discussion / Re: Some important NEWS about the PC Engine!
11/14/2010, 02:24 PM
Quote from: Duo_R on 11/14/2010, 12:22 AMhahahhahahahha how did I miss this??!?!
iObey.....or else!!!!
#243
PCE/TG-16|CD/SGX Discussion / Re: Race is on B1tches! - How many have you cleared?
11/14/2010, 02:29 AM
#244
PCE/TG-16|CD/SGX Discussion / Re: Race is on B1tches! - How many have you cleared?
11/13/2010, 02:31 AM
Note the Chariot, and not the Horse. I actually beat it three times, once without the ladies.
#245
PCE/TG-16|CD/SGX Discussion / Re: Race is on B1tches! - How many have you cleared?
11/10/2010, 01:47 AM
Clear #15:
Akumajou Dracula X - Chi No Rondo / 悪魔城ドラキュラX 血の輪廻
I freaking love this game, I absolutely freaking love this game.

Akumajou Dracula X - Chi No Rondo / 悪魔城ドラキュラX 血の輪廻
I freaking love this game, I absolutely freaking love this game.
#246
PCE/TG-16|CD/SGX Discussion / Re: Race is on B1tches! - How many have you cleared?
11/10/2010, 01:42 AM
Quote from: rag-time4 on 11/06/2010, 05:54 PMWith the help of Allah... Clear #36!! Ryoko-no Ken / Art of Fighting clear!!Grats, rags! Great Job!!
One of the most clunky fighting games ever made.... It's a pretty cool game other than the gameplay itself.
#247
PCE/TG-16|CD/SGX Discussion / Re: Some important NEWS about the PC Engine!
11/04/2010, 04:06 AM
#248
Console Repair/Mod Center / Re: REPAIR GUIDE - TurboExpress/PC Engine GT: Video Fix
10/30/2010, 02:03 AM
ApolloBoy,
These are the two areas that you are going to want to focus on, the positive terminal for the video cap in the blue circle, and the negative solder-point for the capacitor that should be under the pink oval.
On the positive side; Inside the circle is what is left of the trace, I'm assuming. In the right-side of it, is that what's left of the copper trace that led to the pad? If so try to solder the positive side of the capacitor to this. If there is enough of the trace left, but you cant get the leg of the capacitor to attach to the delicate trace, solder a very thin wire like 24 AWG or smaller on one side to the trace and on the other side to the positive leg of the capacitor. If the trace is too far gone, try to attach the positive leg of the capacitor to the hole that I have highlighted with a black dot inside of the blue circle.
On teh negative side; Veeeery carefully scrape with a 1/16" screwdriver in the area under the pink oval. I did this on my express and I saw a solid copper line leading up to the pad. You may want to do the wire trick again. I'm not sure if this is a specific area where you need to ground the cap.
I hope this helps you get you system back online; people please chime in
#250
PCE/TG-16|CD/SGX Discussion / Re: Some important NEWS about the PC Engine!
10/19/2010, 02:31 AM
Quote from: Opethian on 10/18/2010, 11:48 PMHAHAHAHHAHHAHHAHAHAHHAHAHHAHAHAHHAHAHHAHHAHA